
![]()


Q3
Gridiron v2.0 Basic Strategy!
Though it
is nearly impossible to guarentee success in any game, some of the tips
and diagrams presented here may help make the game more fun to play!
General Gridiron Tips...
-- Target
your passing binds to very comfortable locations on your keyboard/controller.
-- Take the time to bind at least the throwball, hailmary and fieldgoal
passing binds.
-- Try to strafe and move around instead of standing still as each round
begins.
-- Do not spend your armor early on, calculate your shots and stay on
the ground.
-- Always keep your eye on the ball carrier no matter if you're on offense
or defense.
Gridiron Tips for Offense...
--
Do not always attempt to get the ball, especially if you spawn farthest
out from the ball.
-- If you spawn close to the ball, cross in front of the ball to help
hide/protect the ball carrier.
-- As a general rule, move against the flow of the defense and stay open
for passes.
-- Try to get behind the defensive players and push them away from the
endzone.
-- Do not use only the hailmary (longest) pass every time you pass the
ball.
-- Attempt long range fieldgoals often, they can add up very quickly and
are easier to make.
Gridiron Tips for Defense...
--
Do not use up your one rail ammo at the beginning of every round.
-- Try not to always run away from your endzone at the beginning of the
round.
-- Always use the gauntlet in large pileups around a ball carrier or a
loose (fumbled) ball.
-- Rarely travel past half way across the field ('the 50 yardline') and
do damage at a distance.
-- Keep fast incoming offensive players distracted by battling them 1
on 1.
-- Resist firing at a ball carrier from behind and sending them into the
endzone.
Helpful diagrams for Q3 Gridiron Map 1 (The 1st Gridiron)
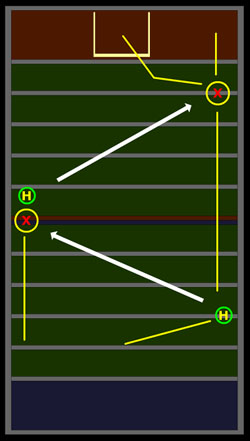
In the following, based on Q3 Gridrion map1, you can better see the distances of the three main passing types as well as the locations where you can make a fieldgoal. The second diagram is a simple offensive play that attempts to scatter the defense as well as confusing the flow of the defense.
As
you can see, from the 20 yardline a hailmary pass will land on the 50
yardline. From there, considering forward movement of approximately 10
yards, another hailmary will land on the 10 yardline. Considering the
first diagram, this final reciever (if successfully executed) can either:
1. Make a fieldgoal for three points. 2. Run in for a touchdown for six
points, or if that player has enough health and armor, 3. A rocketjump
through the uprights for seven points!
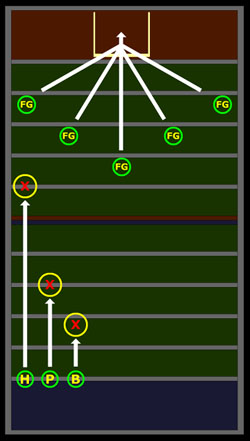
H
= Hailmary, P = Throwball, B
= Throwbullet, FG = Fieldgoal
*All diagrams reflect passes made while
standing flat footed on the ground except for fieldgoals.
More diagrams and plays coming soon!
Vanson Studios (c)2001![]()
![]()